Every Launch Week is an opportunity for Supabase to experiment, try some spicy new designs, and dogfood our own technology. During our previous Launch Week we took Generative AI for a spin. This time we decided to shoot for the stars.
For Launch Week 8, we wanted to make the user-generated tickets a central piece of the launch week theme. To do this, we built a “constellation” of stars - an animated night sky where every user signup was represented as a star, in the form of an “8” shape.
We could approach this animation in a few ways.
For example, animating the stroke-dashoffset on an SVG path, similar to this example, was a good option, but it would have been difficult to randomize and change the shape at a later stage. Other approaches included 2D animation libraries, like Framer Motion , gsap or PixiJS .
Ultimately we decided to take Three.js for a spin using React Three Fiber (R3F) giving us a more powerful toolset to enable us to achieve the best possible result.
Learning Three.js is not a walk in the park but R3F abstracted many of its complexities such as cameras and renderers, to name a few. If you're new to R3F, some of the core primitives they provide for a basic scene include:
Geometries: used to create and define shapesMaterials: manage the texture and color of objectsMesh: used to instantiate polygonal objects by combining a Geometry with a MaterialLights: to shine bright like a diamond 💎🎵Canvas: where you define your R3F Scene
If you want to dive a little deeper, here are a few good resources we found to get a solid grasp on the topic:
- I wish I knew this before using React Three Fiber - from our very own Greg
- Three.js Journey - by Bruno Simon
Setting up the scene
In this article, we’re going to break down the steps to reproduce the Launch Week 8 animation using React Three Fiber in NextJs.
These are the dependencies we’ll need:
_10npm install three @react-three/fiber
If you’re using React 17, we’ll spare you the trouble of finding the last compatible R3F version:
_10npm install three @react-three/fiber@7.0.29
All we need for each particle is a circle geometry with a minimal amount of sides to minimize complexity.
_10import { useMemo } from 'react'_10_10const Geometry = useMemo(() => () => <circleGeometry args={[1.5, 5]} />, [])
A basic standard material with a white color will do just fine. Using the AdditiveBlending module from three provides a more interesting touch when particles happen to overlap, making them shine brighter:
_10import { AdditiveBlending } from 'three'_10_10const Material = () =>_10 useMemo(() => <meshStandardMaterial color="#ffffff" blending={AdditiveBlending} />, [])
Let’s put it together in an R3F Canvas element and wrap up the initial setup with an ambientLight, which will make objects visible, just as real light does:
_40import { useMemo } from 'react'_40import { Canvas } from '@react-three/fiber'_40import { AdditiveBlending } from 'three'_40_40const Geometry = useMemo(_40 () => () => <circleGeometry args={[1.5, 5]} />,_40 []_40 )_40_40const Material = () =>_40 useMemo(_40 () => (_40 <meshStandardMaterial_40 color="#ffffff"_40 blending={AdditiveBlending}_40 />_40 ),_40 []_40 )_40_40return (_40 <div style={{ width: 100vw, height: 100vh, background: "#000000" }}>_40 <Canvas_40 dpr={[1, 2]}_40 camera={{ fov: 75, position: [0, 0, 500] }}_40 >_40 <ambientLight intensity={0.3} />_40 <group>_40 {particles?.map((particle, index) => (_40 <mesh_40 key={particle.username}_40 >_40 <Geometry />_40 <Material />_40 </mesh>_40 ))}_40 </group>_40 </Canvas>_40 </div>_40)
For more context, the dpr values help with pixelation issues and the camera [0, 0, 500] position means that the camera is moved 500 units back in the z-axis to actually see the center [0,0,0] of the scene.
One thing to note is that the R3F Canvas renders a transparent background, so in order to see the white particle, we need to set the background of the parent html element to a dark color.
We created a separate component for the Particle, which will later encapsulate the animation logic.
_10import React, { useRef } from 'react'_10_10const Particle = ({ children }) => {_10 const particle = useRef(null)_10_10 return <mesh ref={particle}>{children}</mesh>_10}_10_10export default Particle
Load users from Supabase
You might have noticed we haven’t instantiated the particles yet. As we mentioned earlier, we wanted each particle to represent a ticket generated by a user and stored in the database. Let’s fetch the signups from the tickets table in our Supabase project (you might need to start your own Launch Week to fill your table):
_10const [particles, setParticles] = useState([])_10_10const loadUsers = async () => {_10 return await supabase.from('lw8_tickets').select('*')_10}_10_10useEffect(() => {_10 const { data: users } = loadUsers()_10 setParticles(users)_10}, [])
We updated the constellation in realtime whenever a new ticket was generated, but we’ll skip over this part to keep the article shorter. Since it’s all open-source, you can dive deeper here if you wish.
Animating the particles
To move the particle around the screen we are going to leverage a few different concepts: useFrame and trigonometry 🤯
useFrame
Generally, the most optimal way to animate things in a browser viewport, using javascript, is by leveraging a method called requestAnimationFrame , which “tells the browser that you wish to perform an animation and requests that the browser calls a specified function to update an animation right before the next repaint.”. R3F has a similar hook called useFrame that lets you execute code on every frame of Fiber's render loop. We’ll use this to change the position of the particles over time in a few moments.
Using time as an animation variable
We can extract time information from the useFrame clock parameter, to know how much time has elapsed in our application, and use that time to animate a value. Updating the x position with Math.sin() generates a horizontal oscillating movement. Multiply it with a widthRadius variable to customize the amplitude of the movement.
_13const particle = useRef(null)_13_13const widthRadius = 100_13const heightRadius = 100_13_13useFrame(({ clock }) => {_13 const timer = clock.getElapsedTime()_13_13 particle.current.position.x = Math.sin(timer) * widthRadius_13 }_13})_13_13return <mesh ref={particle}>{children}</mesh>

Combine the previous horizontal movement with a Math.cos() on the y position to draw a circle:
_10particle.current.position.y = Math.cos(timer) * heightRadius

Calculating the circumference we can get the time the x position takes to complete a full circle.
_10const circumference = (config.widthRadius * Math.PI * 2) / 100
When that happens, we can invert the cos sign on every other loop to obtain a basic 8 shape.
_10const isEven = Math.floor(timer / circumference) % 2 == 0_10_10particle.current.position.x = Math.sin(timer) * widthRadius_10particle.current.position.y = isEven_10 ? Math.cos(timer) * heightRadius - heightRadius_10 : -Math.cos(timer) * heightRadius + heightRadius

At this point, we played around with a number of parameters that made the animation more randomized and interesting.
For example, we randomized the speed and the delay of each particle:
_10const minSpeed = -0.3_10const maxSpeed = 0.4_10const speed = Math.random() * (minSpeed - maxSpeed) + maxSpeed_10_10const delayOffsetFactor = 100_10const delayOffset = Math.random() * delayOffsetFactor_10_10[...]_10_10const timer = clock.getElapsedTime() *** speed + delayOffset**
We offset the shape on the x-axis, to concentrate most of the particles in the core of the 8 shape and leave a smaller amount externally, by playing around with exponentials using Math.pow() in combination with some more randomization.
_13const xThickness = 7_13const xRandomnessShape = 2.2_13const xRandomness = 5_13_13const pathOffset =_13 Math.pow(_13 Math.random() * xRandomnessShape,_13 xRandomness - xRandomness / 2_13 ) * xThickness_13_13..._13_13particle.current.position.x = Math.sin(timer) * widthRadius + pathOffset
Honestly, this was the result of a lot of playing and tweaking around, and we certainly didn’t hit the best possible result on the first try. Perhaps you want to take some time to experiment with the math - you might find even better and more configurable results.
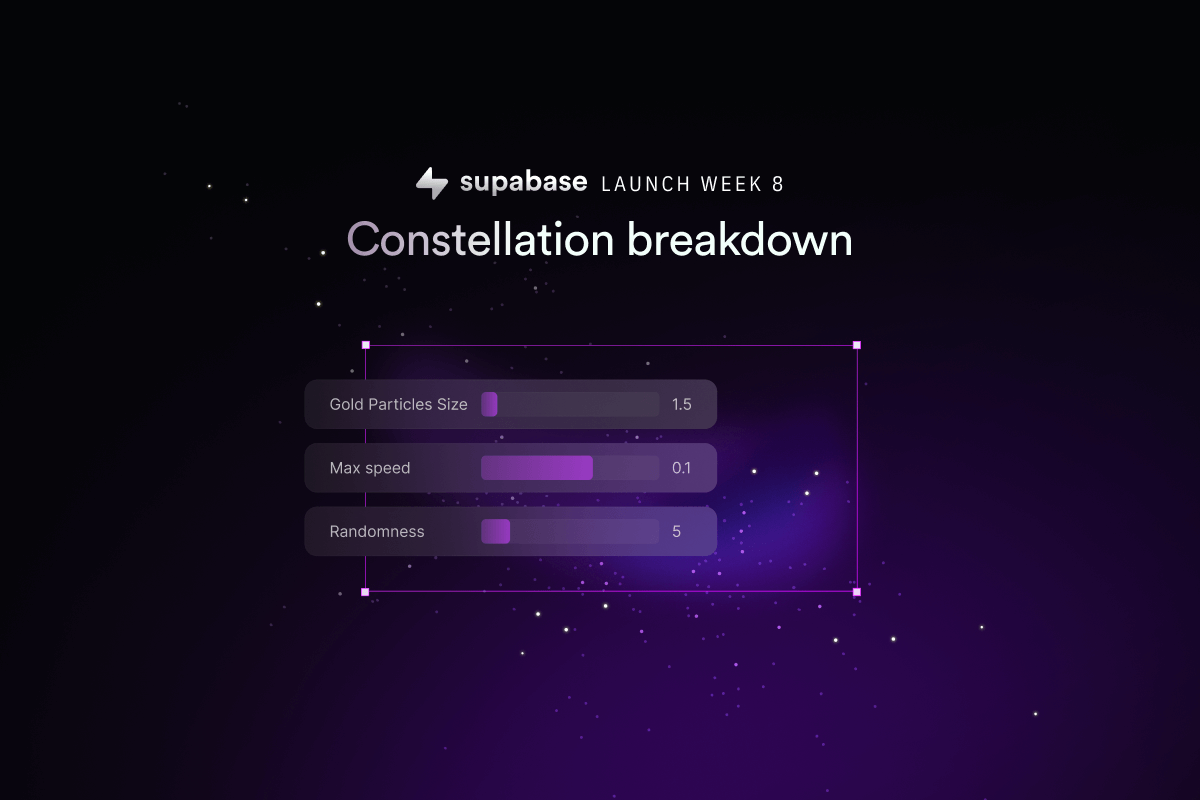
GUI playground
What really helped to visualize the shape, gather feedback, and decide on a final design was adding a GUI to play around with the values. You can try for yourself by appending #debug to the supabase.com/launch-week#debug url. Go crazy with it.
We used the dat.gui library:
_10npm install dat.gui@0.7.9
Which needs to be loaded asynchronously, otherwise it raises a window is not defined error.
_10const init = async () => {_10 const dat = await import('dat.gui')_10 const gui = new dat.GUI()_10}_10_10useEffect(() => {_10 init()_10}, [])
Then we prepared a useParticlesConfig hook with all the configuration wired up to the GUI. Whenever the GUI updated, we also updated react state.
_66import { useEffect, useState } from 'react'_66import { range } from 'lodash'_66_66let defaultConfig = {_66 particles: 1500,_66 widthRadius: 100,_66 topHeightRadius: 80,_66 bottomHeightRadius: 100,_66 xThickness: 7,_66 xRandomnessFactor: 2.2,_66 xRandomnessShape: 2.2,_66 xRandomness: 5,_66 yThickness: 20,_66 max_speed: 0.1,_66 min_speed: -0.1,_66}_66_66const useParticlesConfig = (): any => {_66 if (typeof window === 'undefined') return null_66 const hash = window.location.hash_66 const isDebugMode = hash.includes('#debug')_66 const [particles, setParticles] = useState(range(0, defaultConfig.particles))_66_66 const [config, setConfig] = useState(defaultConfig)_66_66 const handleSetConfig = (name, value) => {_66 setConfig((prevConfig) => ({ ...prevConfig, [name]: value }))_66 }_66_66 const init = async () => {_66 if (!isDebugMode) return_66 const dat = await import('dat.gui')_66 const gui = new dat.GUI()_66 const particlesFolder = gui.addFolder('Particles')_66 const shapeFolder = gui.addFolder('Shape')_66_66 particlesFolder_66 .add(config, 'particles')_66 .min(1)_66 .max(5000)_66 .step(1)_66 .onChange((value) => {_66 handleSetConfig('particles', value)_66 setParticles(range(0, value))_66 })_66 shapeFolder_66 .add(config, 'widthRadius')_66 .min(1)_66 .max(200)_66 .step(1)_66 .onChange((value) => handleSetConfig('widthRadius', value))_66_66 // add desired folders and parameters_66_66 particlesFolder.open()_66 shapeFolder.open()_66 }_66_66 useEffect(() => {_66 init()_66 }, [])_66_66 return { config, handleSetConfig, particles, setParticles, isDebugMode }_66}_66_66export default useParticlesConfig
Here is the final code:
_84import React, { useMemo, useEffect, useState } from 'react'_84import { Canvas, useFrame } from '@react-three/fiber'_84import { AdditiveBlending } from 'three'_84import useParticlesConfig from './hooks/useParticlesConfig'_84_84const ParticlesCanvas = () => {_84 if (typeof window === 'undefined') return null_84 const { config, particles } = useParticlesConfig()_84_84 const Geometry = useMemo(_84 () => () => <circleGeometry args={[config.particlesSize, config.particlesSides]} />,_84 []_84 )_84_84 const Material = () =>_84 useMemo(_84 () => (_84 <meshStandardMaterial_84 color={config.color}_84 blending={config.particlesBlending ? AdditiveBlending : undefined}_84 />_84 ),_84 []_84 )_84_84 return (_84 <div style={{ width: 100vw, height: 100vh, background: "#000000" }}>_84 <Canvas_84 dpr={[1, 2]}_84 camera={{ fov: 75, position: [0, 0, 500] }}_84 >_84 <ambientLight intensity={config.lightIntensity} />_84 <group>_84 {particles?.map((particle, index) => (_84 <Particle_84 key={particle.username}_84 >_84 <Geometry />_84 <Material />_84 </Particle>_84 ))}_84 </group>_84 </Canvas>_84 </div>_84 )_84}_84_84const Particle = ({ children }: Props) => {_84 const particle = useRef(null)_84_84 const pathOffset =_84 Math.pow(_84 Math.random() * config.xRandomnessShape,_84 config.xRandomness - config.xRandomness / 2_84 ) * config.xThickness_84_84 const verticalRandomness = Math.random() * (config.yThickness - 1) + 1 - config.yThickness / 2_84_84 const speed = Math.random() * (config.min_speed - config.max_speed) + config.max_speed_84_84 const circumference = (config.widthRadius * Math.PI * 2) / 100_84 const delayOffsetFactor = 100_84 const delayOffset = Math.random() * delayOffsetFactor_84_84 useFrame(({ clock }) => {_84 const timer = clock.getElapsedTime() * speed + delayOffset_84 const isEven = Math.floor(timer / circumference) % 2 == 0_84_84 // When the loop count is even, draw bottom 8 shape_84 // if odd, draw top 8 shape_84 particle.current.position.x = isEven_84 ? Math.sin(timer) * config.widthRadius * config.widthRatio + pathOffset_84 : Math.sin(timer) * config.widthRadius + pathOffset_84 particle.current.position.y = isEven_84 ? Math.cos(timer) * config.bottomHeightRadius -_84 config.bottomHeightRadius +_84 verticalRandomness_84 : -Math.cos(timer) * config.topHeightRadius + config.topHeightRadius + verticalRandomness_84 })_84_84 return <mesh ref={particle}>{children}</mesh>_84}_84_84export default Particle
Now THAT’S how you create a new constellation ✨. Feel free to use the code and learnings to build your own.
Conclusion
In this journey, you saw how to use Three.js and harness the power of React Three Fiber and creative experimentation to craft an animation. We leveraged trigonometry, animation hooks, and GUI playgrounds to build a "8" shape formed by user-generated stars.
If you loved this and the new Launch Week 8 branding, make sure to tune in on Monday at 09 AM PT as we unveil the full landing 💥